
Helpful Camera Gear to Clamp, Stabilize, and transport.
The Benefits of Investing in the Right Gear to make your next shoot easier.
Whether you are a professional photographer or a hobbyist, having the right gear is essential for getting the job done. Carrying, transporting, stabilizing, and clamping your expensive camera equipment can be difficult without the proper gear. In this post, we will explore why these items are important and how they can make a substantial difference in your experience as a photographer.
The gear listed below are items I have personally invested in over the past 15 years. Some serve a greater purpose than others but all have made a big enough impact in my daily workflow and on shoots that they made this honorary list. Full disclosure, should you buy these items through the links below, I will receive a small commission for sharing my secret list of my must-haves. So, without further ado, let’s review some gear!
Disclaimer: This website uses affiliate links, meaning: at no additional cost to you, we earn a small commission if you click-through and make a purchase. As an Amazon Associate I earn from qualifying purchases. We only feature products that we believe in and use ourselves. Your support means the world to us and allows us to host this website. Thank you!
Clamps and arms
Clamps are great tools for keeping delicate items such as lenses securely attached to their mounting point for worry-free transport or storage between shoots. Simply put, making sure all pieces stay snugly connected prevents accidental damage caused by knocks that could happen during transportation or storage; avoiding costly repairs or replacements down the road! Furthermore, clamps offer additional versatility such as allowing users to attach additional accessories to their set-up if necessary without taking up too much space; perfect for close-quarters photo and video shoots!
I own several of each of these clams and arms. I not only use them on shoots, but I use them around the house for random projects and even building forts with my kids! Each of the super clamps can receive 1/4-inch and 3/8-inch threads to accommodate lights, arms, standard studs, external monitors, and more. No surface is safe from a clamp when I am in setup mode. Tripods, table edges, light stands, my media cart, chairs, etc., all are fair game when it comes to clamping accessories.
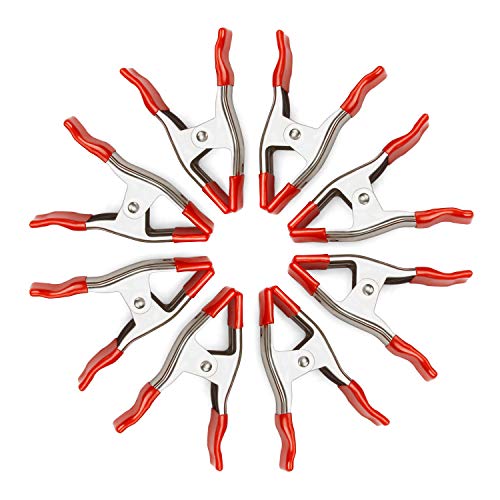
The spring clamps are another tool of the trade that most are not aware of or take for granted. I have used these to pin back clothing, clamp down backdrops, hold lights and microphones, help support bounce boards, and of course, hold up blankets when building forts. These are inexpensive and can be found online or in any hardware store. Like the super clamps, it is a good idea to have several of these with you on-site, or in your studio at all times.


Smooth Audio is stable audio
Properly stabilizing a microphone is essential for achieving the best audio quality possible. Microphones are delicate and thus need to be securely held in place so that any bumps or jolts do not affect the sound quality. When shooting audio, make sure you have the right gear such as shock mounts, stands and clamps to ensure the microphone stays in one place and the audio remains clear. This will help create consistent recordings with no background noise or distortion, giving you greater control over your final product.
If you are like me, you spend a lot of time getting your lighting and camera dialed in that it is easy to forget about prepping for audio. As important as visuals are, it is audio that can make or break footage. I need to remind myself to not overlook the importance of setting up my audio properly and this typically starts with using the right mic for the job and having the right stability to ensure there is no interference.
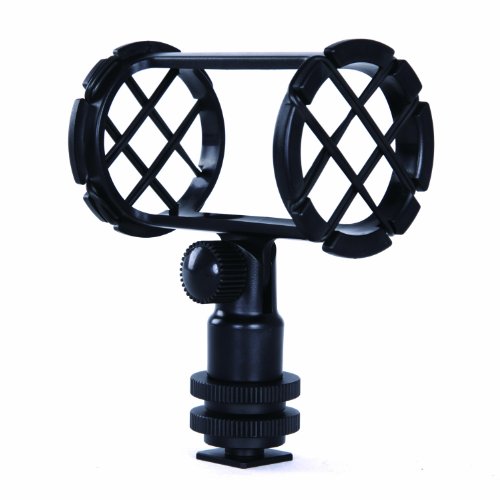
You will see several cold shoe options in the list below. This is because if I am in the field and capturing b-role, which seems to be where I spend a lot of time, I want natural audio from the environment. A cold shoe mount easily attaches to my camera or the camera cage and quickly gets the job done. Cold shoe mounts usually have a 3/8-inch thread option on the bottom which allows you to connect to tripods, light stands, or adjustable arms as well. This is really helpful if you need quickly transition from your camera to a studio or interview setup. I also prefer to have my shotgun microphones suspended via rubber bands or elastic chords. These bands absorb a lot of vibrations and prevent distortions in your audio.
Boom arms for your desk are great options for studios – especially if you are getting into voiceovers and podcasts. Admittedly, I use them for lighting as well! These arms are easily adaptable to hold several different thread sizes and can clamp onto any flat surface giving the best ergonomics with your microphone.
Last but not least, lavalier microphone tie clips. I use lav mics more than any other style of microphone as I typically need to be wire-free and I want clear direct audio from a specific source (I do a lot of interviews). A lav mic usually comes with its own clip but they are easily broken or get lost and it is a great idea to have a small bag of these ready to go. Note, I have used gaffer tape to secure a lav mic to clothing or a surface in the absence of a clip. I personally find the clips more of a sure thing as they do not let loose during a shoot. If you use lav mics, this is an inexpensive hack that is sure to make you look like a hero on set. Do not be the person standing next to a CEO who is already annoyed they have to go on camera and you can’t attach a mic to them.


Stabilization Options
Stabilizing your gear is key when taking photos or videos in challenging environments. Stabilization accessories are essential for getting the professional looks you want from your shots, whether it be camera cage handles, monitor mounts, gimbals, or sliders. With these helpful tools, you can get clean, stable, and smooth shots that look incredibly professional.
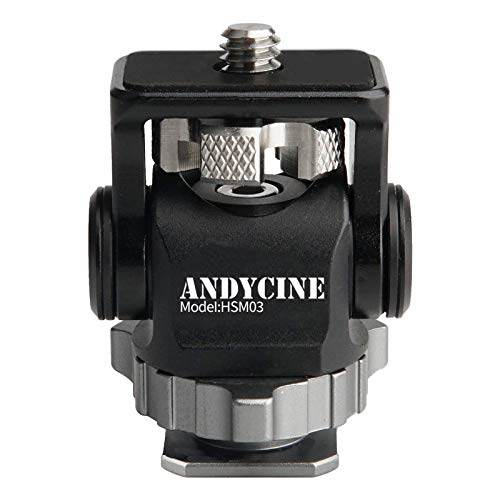
Field monitor mounts and camera body cage handles are more recent additions to my setup as they are not needed if you are trying to save money and travel super lean in the field, however, they are incredibly helpful in adding accessories to your setup and contributing to getting the right angles with your gear. I have used field tilt monitor mounts for – shocker – field monitors as well as microphones. These are small and easy to pack and fit into your camera’s hot shoe mount. The body cage handles are great in general as they usually provide numerous 1/2” and 3/8” threaded options for all sorts of studs and attachments. They also offer cold shoe mounts along with other mounting options depending on the model you go with. I personally use and love the SmallRig option listed below as I get two cold shoe mounts, a plethora of threaded holes, and the allen wrench for connecting the handle to my camera cage is built into the handle and secured using magnets.
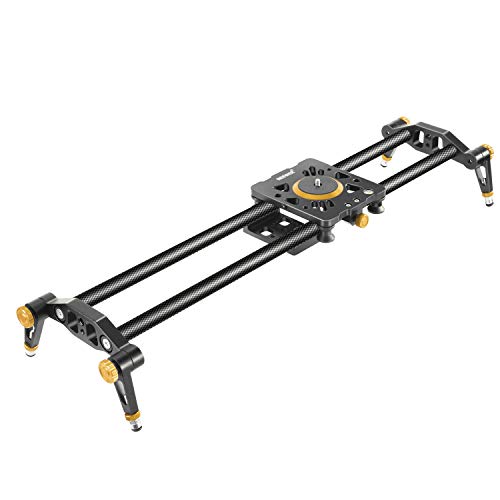
The Neewer slider is one I still use. It is just long enough to get plenty of content in your pans. The rods are carbon fiber and offer a strong yet smooth slide. The adjustable legs fold up nicely for travel purposes as well as create different angles when sliding on a large surface. The mounting plate and ends of the slide accept 1/2-inch and 3/8-inch threads so you can connect your slider to multiple tripods or stands to increase stability.
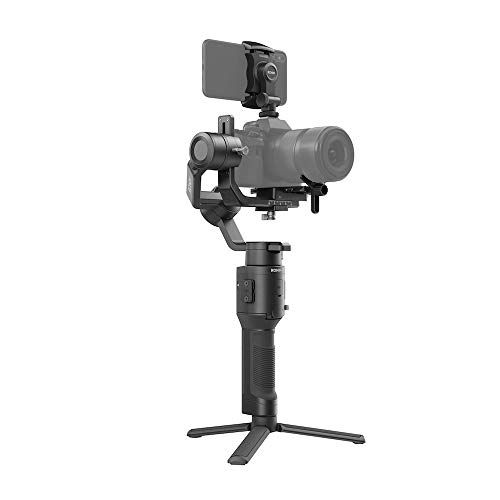
The DJI Ronin Gimbal – this stabilization device is a beast. I could do an entire blog post just on this stabilizer. I have smaller gimbals for GoPros and cell phones, but I wanted this model to handle the weight of my DSLR and mirrorless cameras. The 3-axis motors create super smooth and fluid movements with the camera. I have used this while running, hanging out of the back of a car on a racetrack, and in the woods in a UTV and all of the footage comes out smooth as the gimbal absorbs the jerks, jolts, and bounces. Unlike the other options listed that do not require a battery, the Ronin battery is amazing. I have used it non-stop for 10+ hours of shooting! A perfectly balanced Ronin will prolong the battery life and help keep up with demand. Impressive is an understatement.

Transporting and carrying options
Right out of the gate, find ways to secure and teether your gear. Camera gear can be pricey (specifically camera bodies and lenses) and it is soul-crushing when you drop these items and render them useless.
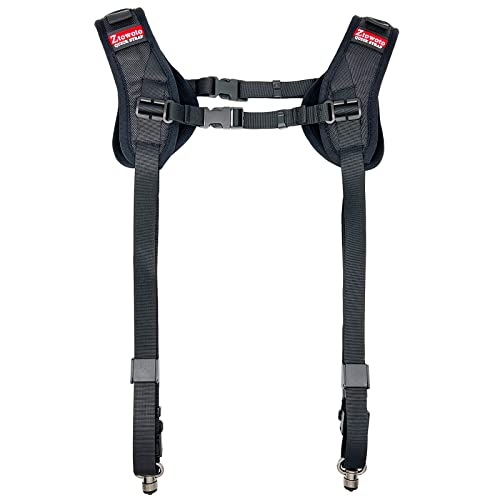
I have two different body harness systems and I almost always use one of these on every shoot. The double strap harness is my default option and allows me to safely carry two different cameras using two different lenses. I have used this on shoots with one camera being for photos and the other exclusively for video. Another combination I use a lot is to have one camera that has a unique prime lens while the other uses a zoom lens. These combos allow me to quickly get the shot I need without going into my backpack or wherever I stored my gear for the day.
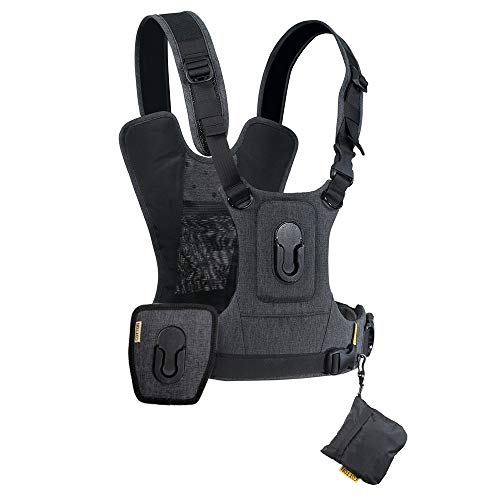
The other body harness, the Cotton Carrier, provides the same support but is more intense. I fell in love with this design as I have been on shoots where I need my gear more secure to my body and out of the way. I first used this style of harness on a shoot at the Rolex 24-hour race at Daytona Beach, FL. I was dropped off with everything I could carry and had to “survive” for 24 hours capturing photos and video of race cars. I needed flexibility but I also needed to be mobile so I could walk the 3.56-mile-long track. Since then, I have used this style of harness for skiing shoots, outdoor and hunting shoots, UTV shoots, etc. This specific brand, Cotton Carrier, has a hidden rain cover, holder for an umbrella, tether lines, hook options to clip other mounts and gear to you, and a unique attachment system that prevents the camera from sliding off of you. You can only get the cameras off of your harness by turning them and lifting which ensures your expensive gear stays tight to your body while you work on other tasks in the field.
Ok, enough about harnesses. Camera bags – there are so many out there but not all are created equal nor is any bag a perfect design. So far, the Lowepro ProTactic Modular Backpack has lasted the longest and provides the most flexibility for the different types of shoots I perform. Folks, I load this thing up! I have packed this bag with one DLSR, two mirrorless cameras (both have body cages), two shotgun mics, two lav mics, six lenses, two field monitors, a DJI Mavic Mini drone, Go Pro Hero 10 with accessories, batteries, and chargers for all of these items, and clamps and accessories to accommodate everything I listed. Oh, I also add a water bottle, hand sanitizer, business cards, cord straps, a tablet and/or laptop, my slider, and a tripod to the outside. This bag is a beast and has yet to rip (like all my other bags) when supporting this amount of gear and weight. As you can imagine, it gets incredibly heavy. I have traveled all over the United States with this bag and thus watched numerous TSA agents try to pick it up and fail to do so. Yikes! My macro point, if you need a tough, heavy-duty camera bag that can handle anything you put in it and any environment you shoot in, this is my recommendation.
A recent addition is my “media cart.” I am so proud and excited about this cart. I had another option for the longest time, but the wheels were too small to roll over rough terrain and eventually seized up on me. Also, the weight I added to the dolly was more than what it was designed for. I eventually chose this multi-cart concept. It can hold hundreds of pounds, has locking wheels (a must-have folks), and telescoping arms and base platform. When I am doing larger shoots where I need to bring a full light, audio, and multi-camera setup, I can quickly “toss” two Pelican cases loaded with gear, a gaffers bag stuffed with light stands, boom arms, and tripods, lighting bags, my camera bag, my gimbal case, and anything else I need to get the shots I want onto this cart knowing it will support everything. I can quickly roll all of these heavy items efficiently by myself without breaking a sweat or looking awkward in front of clients. Role into your shoots with one trip and a smile on your face. Don’t be like old Jared where you take multiple trips, need to ask people for help, and are ready for the shoot to be over before you start. Work smarter - not harder.


Random Must-haves
These items are recent additions to my different in-office and in-the-field setups.
The dual monitor stand is the most random item in this list but does meet the stabilization qualifier. I have recently upgraded to large, 30” curved monitors to help with video editing and a constant need to have more screen real estate for editing. Having such wide monitors stacked side by side was not helpful as it was difficult to focus on a centralized area and keep an eye on multiple modules in my editing software. I started noticing other creatives stacking their monitors and jumped on board with this trend. Needless to say, I am much happier with the stacked workflow as my posture and ergonomics have improved significantly. If you are not stacking large monitors, I recommend trying it out.
Carabiners – If you read about my camera bag and body harnesses, then you know how much I value having everything tethered and safely within arm’s reach. Carabiners are an inexpensive way to attach multiple different bags, cards, devices, etc. to things. You do not need to get climbing-grade clips either to support your camera gear needs. Give it a shot! Start clipping some carabiners to your gear and I bet you find yourself using them more and more.
Gaffers Tape is a must. This tape does not leave a sticky residue yet has an impressive holding ability to it. As I previously mentioned in the microphone section, I have used gaffer tape to secure lav mics when tie clips break or go missing. I have used this tape to secure backdrops, block out logos and branded clothing, and secure XLR and other cords to prevent folks from tripping onset. Heck, I even helped an audio specialist fix his jeans that ripped down the crotch seam onset. You never know what you will run into when you are on the clock so always best to be prepared for anything.
Cable ties are also a unique hack that most overlook or never consider. On any set, there can be numerous cables running in and out of every camera, monitor, light source, and microphone. It can be pure madness. I am a firm believer in cable management – both on set and for storage applications. Extra lengths of cables get secured to using elastic ties such as these. There is no shortage of cable tie options on the market, but I like these as I also find a use for them in securing other items beyond camera gear, such as charging cables for my laptop and tablet, car keys, holding covers and caps down, and more. Also, I find myself wearing these things all the time on my wrist.


